This article describes the different plugin configuration options for the Cookie Banner plugin.
Plugin settings
General
Active
If this checkbox is checked, the plugin will enable the Cookie Banner. If it is not checked, the plugin will not function.
This option is in addition to the WordPress plugin enabled/disabled state, so you can first configure the Cookie Banner before showing it.
Preference max age
Here you can configure how long the Cookie Banner will not be shown after a user has selected their preference, i.e. how long their preferences are saved.
Note that if the user clears their cookies, or visits from another browser (or incognito from the same browser), the popup will be shown again.
The value is in days. Default: 365 (one year).
Exclude pages
Select any page the popup should not be shown, whether the user has selected their preferences or not.
This can be used to exclude e.g. privacy policy pages, which would otherwise be blocked by the popup.
Any selected page that has a translation with the WPML multilingual plugin is also automatically excluded.
Reset all visitor preferences
Pressing this button will reset all previously selected visitor preferences. This means every visitor will be shown the cookie popup again, even if they selected their preferences before and are not over the max age.
This feature can be useful when you change your privacy policy and need visitors to select their preferences again.
Also note that when adding new categories, this feature needs to be used if you want returning visistors to have the possibility to select it. Otherwise, they won’t trigger scripts and permissions linked to this option until they go over the max age.
Style
See the Cookie Banner styling guide for more information about styling the Cookie Banner plugin with CSS.
Overlay transparency
Select the percentage (a number between 0 and 100) that represents how opaque the overlay should be.
0 is fully transparent (i.e. you can see the website in the background), 100 is fully black.
Title color, Background color, Border color
Color of the title in the popup, the background of the popup, and the color of the popup border.
The text color can be changed in the WYSIWYG editor (Content tab).
Title classes, Save button classes, Accept all button classes
Enter any class name(s) you’d like the title or buttons to have.
This can be useful when you have a specific class name in your theme for existing titles or buttons.
Note that these values are copied verbatim to the class attribute.
Additional CSS
If you’d like to style the Cookie Banner popup, you can add the CSS here.
It is recommended to add the style here and not in your theme, as it will not linger in your theme when you uninstall the plugin.
CSS entered here is copied verbatim to all pages, and below the default CSS (see the Cookie Banner styling guide for more information).
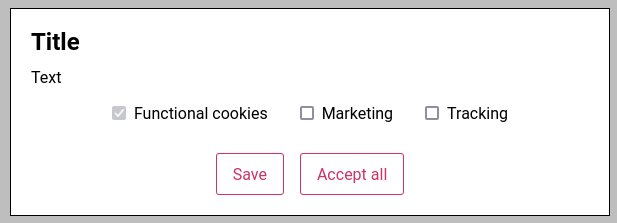
Content
Title
The title of the Cookie Banner popup.
Text
The content of the Cookie Banner popup.
You can add links here to your privacy policy; if so, make sure to exclude those pages from the Cookie Banner functionality.
Save button text, Accept button text
The text shown on the buttons.
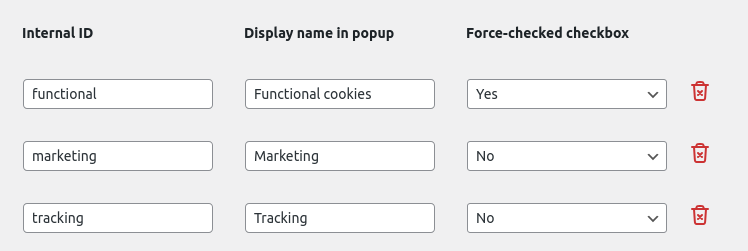
Categories
You can create one or more categories here. Categories are represented in the Cookie Banner popup as checkboxes.
Each category has an Internal ID, display name, and a mandatory checkbox.
- Internal ID: enter a lowercase word, e.g. functional. They are not shown anywhere, but used internally.
- Display name in popup: this is the text shown next to the checkbox, e.g. Functional cookies.
- Force-checked checkbox: whether or not this is a mandatory category. This is useful for “functional” cookies, that are required to use the website.
A category can be removed with the trash can icon shown on the right. A category can only be removed if it is not being used in a Snippet (see below). If you want to remove such a category, first remove the Snippet.
Example configuration
Snippets
If there are no categories yet, you can’t add Snippets. Create one or more categories first.
A Snippet is a piece of JavaScript or HTML code that is executed at a specific place at a specific trigger. The following options are available for each Snippet:
- Category: only trigger the code when this category has been accepted by the visitor.
- Location: add the code in this location. Options are:
- Inside the <head> tag: output via the wp_head WordPress hook, with a priority of 1. This should result in the code being put early in the <head> tag.
- After the <body> open tag: output via the after_body WordPress hook, with a priority of 1. This should result in the code being put early after the <body> tag. If your theme doesn’t support this hook, it will be put as soon as possible before the </body> tag (via the wp_footer WordPress hook).
- Before the </body> tag: output via the wp_footer WordPress hook, with a priority of 1. Outputs before the closing body tag with a priority of 1.
- Type: when this code should be triggered. Options are:
- JavaScript, only include after consent: this will only trigger the JavaScript code once the user has given their consent. If they have previously given their consent, this code will trigger on page load, otherwise it will trigger after the ‘save’ or ‘accept all’ button has been pressed.
- JavaScript, always include: always execute this code, even if consent hasn’t been given.
- HTML, always include: always output this HTML, even if consent hasn’t been given.
- Snippet: the code that needs to be executed. Note that if a JavaScript type has been chosen, only enter JavaScript, not HTML (i.e. don’t enter <script> tags).
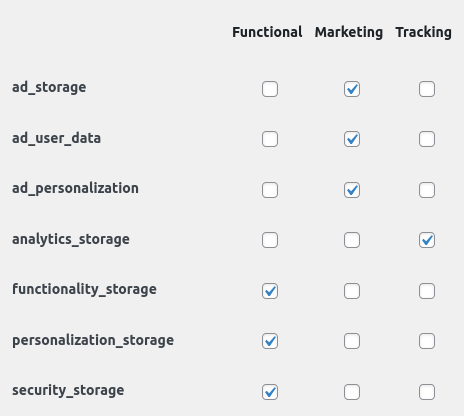
Google Consent Mode
If there are no categories, this page will be disabled. Create one or more categories first.
Active
Whether or not any Google Consent Mode flags should be sent to the dataLayer.
If disabled, no default or update consent dataLayer event will be pushed.
GCM
Here you can select the options regarding the Google Consent Mode flags in combination to your categories.
For each Google Consent Mode flag, you can select whether it should be set to granted when the visitor has given consent.
The plugin will always first output a default consent event, in which all enabled flags (checkboxes in the settings page) are set to denied.
Once the user has selected their preferences (in the popup), an update event will be pushed, with the accepted category GCM flags.
If a visitor has previously selected their preferences, the default and update events are sent directly on page load.
Example configuration